Boost.Asio 网络库的 I/O 模型
Asio 是一个用于网络和低级 I/O(直接对文件描述符进行的 I/O)编程的跨平台 C++ 库,它使用现代 C++ 方法为开发人员提供一致的异步模型。本文基于 Boost 1.83.0 版本介绍 Asio 的 I/O 模型,以及它在网络编程中的应用。
Asio 在 ISO/IEC TS 19216:2018 中作为 “C++ Extensions for Networking” Technical Specification(简称 Network TS)的实现,被期望成为 C++ 标准的一部分。但是目前 Network TS 仍未成为标准,反而是后来居上的 Sender/Recevier 模型更有希望成为 C++26 的一部分。为了与官方文档保持一致,本文将使用 Network TS 的 API,它与原始 Asio API 的区别可以参考文档。
Asio I/O 模型
异步操作流程
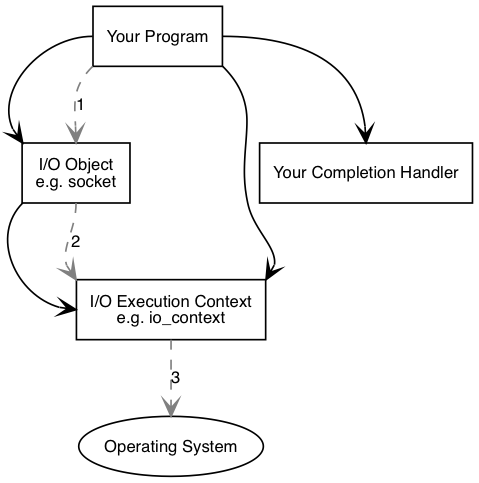
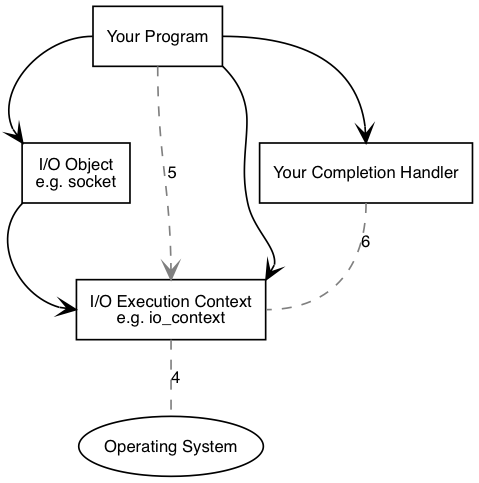
Asio 同时支持同步和异步操作,这里我们直接从异步开始。下图展示了 Asio 中异步操作涉及的组件。我们所写的程序要至少包含一个 I/O 执行上下文,比如 boost::asio::io_context, boost::asio::thread_pool, boost::asio::system_context。

为了执行 I/O 操作,我们还需要 I/O 对象,比如 boost::asio::ip::tcp::socket, boost::asio::ip::tcp::acceptor 等。我们需要调用 I/O 对象来初始化异步操作:
1
socket.async_connect(server_endpoint, your_completion_handler);
这里的 your_completion_handler 是一个函数对象,它的函数标签必须与该接口要求的一致,这个函数对象我们称为完成句柄 (completion handler)。我们可以在官网上查找每个异步 API 要求的完成句柄的函数签名。
I/O 对象将请求转发给 I/O 执行上下文,再由 I/O 执行上下文示意操作系统开始异步连接。

时间流逝,操作系统表示连接操作已经完成,其结果被放入队列,将由 I/O 执行上下文取出。当我们使用 io_context 作为 I/O 执行上下文时,我们必须调用 io_context.run(),来取出结果。io_context.run() 会一直阻塞直到没有未完成的异步操作。
在 io_context.run() 内,I/O 执行上下文从队列中取出操作的结果,将其翻译为 error_code,传递给完成句柄。
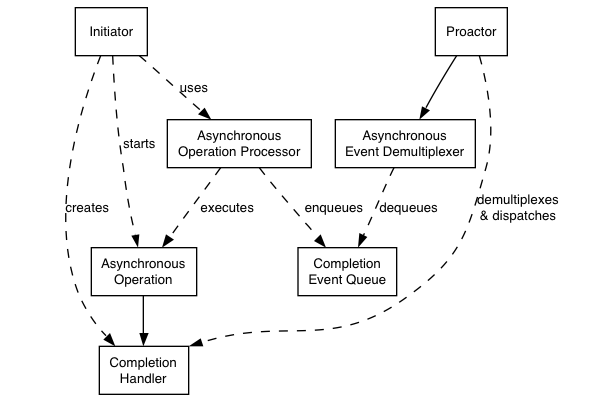
Asio 的 Proactor 模型

上图是 Asio 采用的 Proactor 设计模式,包含的信息有:
- 异步操作 (Asynchronous Operation):定义一个被异步执行的操作,比如对套接字读或写。
- 异步操作执行单元 (Asynchronous Operation Processor):执行异步操作,并在操作完成时将事件放入完成事件队列中。
- 完成事件队列 (Completion Event Queue):缓冲这些完成事件,直到它们被异步事件解复用器出队为止。
- 异步事件解复用器 (Asynchronous Event Demultiplexer):阻塞等待完成事件队列中的事件,并将已完成的事件返回给其调用方。
- Proactor:调用异步事件解复用器以使事件出队,并分派 (dispatch) 完成句柄(即选择一个线程执行与事件相关联的函数对象)。Proactor 抽象为
io_context类。 - 完成句柄 (Completion Handler):处理异步操作的结果,是函数对象。
- 初始化器 (Initiator):初始化异步操作的代码。
Windows 上,由于 IO Completion Port (IOCP) 系统级异步 I/O 的存在,该 Proactor 模型得以实现。首先,异步操作执行单元属于 Windows 操作系统,即异步操作是由系统完成的。例如,从套接字读数据,数据放入用户缓冲区以及之前的工作都是由操作系统完成的(异步 I/O 性能更好,它直接将数据拷贝到用户缓冲区,不经过内核)。其次,完成事件队列也是由 Windows 系统管理,我们只需要用 GetQueuedCompletionStatus 函数即可获得一个完成事件,这就是 Asio 在异步事件解复用器中的做法。
在 Linux/Unix 等平台上,长期缺少高效的系统级异步 I/O 功能,所以 Asio 利用 epoll 这种 Reactor 模式的 I/O 操作实现了用户角度下的 Proactor 模式。在这种设计中,组件的实现方式发生了变化:
- 异步操作执行单元:使用 epoll 的 Reactor。当 Reactor 指示准备好执行操作时 (
epoll_wait返回),执行单元执行异步操作并将相关联的完成句柄放入完成事件队列中。- 从系统角度看,这里其实不能称为异步操作了。Asio 底层实际上执行的是非阻塞的同步操作,从内核缓冲区读取数据的操作是同步进行的。
- 完成事件队列:一个链表形式的完成句柄队列,这些完成句柄都是就绪的。
- 异步事件解复用器:检查指示完成事件队列中是否有完成句柄的条件变量,取出完成句柄并返回给调用者。
可以看出,Reactor 和 Proactor 的区别在于完整的 I/O 操作(包括读操作时将数据放入用户缓冲区,写操作时从用户缓冲区取走数据)是否是由第三方完成的。都是第三方完成的是 Proactor,否则是 Reactor。这也是同步 I/O 系统调用与异步 I/O 系统调用的区别。非阻塞 I/O 系统调用需要用户进程主动陷入内核拷贝数据到用户缓冲区,因此属于同步 I/O。
严格地说,第三方仅指操作系统,Asio 在 Windows 下是 Proactor 模型,在 Linux/Unix 下是 Reactor 模型。但是从 Asio 使用者的角度来看,第三方是 Asio 库和操作系统,Asio 跨平台地提供了 Proactor 模式的使用体验。
Linux 下多线程 io_context.run()
在 Linux 下,epoll_wait 仅发生在执行 io_context.run() 后。如果有多个线程对同一个 io_context 调用了 run() 方法,那么同一时间只有一个线程在 epoll_wait。事件触发导致 epoll_wait 返回后,对套接字的操作可以由另一个线程执行。当操作完成后,完成句柄被放入完成事件队列,然后被分派给另一个线程。总的来说,多线程条件下,下面三类工作可以由不同线程完成:
- 某一个线程调用
epoll_wait,等待事件出现。 - epoll 事件触发后,某一个线程被选中来处理事件,它调用
accept,recvfrom,sendto等函数。 - 完成句柄就绪后,某一个线程被选中来执行完成句柄。
上述信息使用
strace查看系统调用得到。
使用 Asio
io_context::poll, io_context::poll_one, io_context::run, io_context::run_one
如前所述,io_context::run 会一直阻塞直到没有未完成的异步操作。异步操作未完成时,所关联的完成句柄就处于挂起状态。异步操作完成时,所相关联的完成句柄转为就绪,被分派 (dispatch) 给某个线程去执行。
与 run 不同,poll 函数立即分派所有就绪的完成句柄,但不等待任何挂起的完成句柄。如果没有就绪的完成句柄,即使有挂起的完成句柄,它也会立即返回。
run_one 和 poll_one 与 run 和 poll 的区别在于,它们只分派一个就绪的完成句柄后就返回,其余行为分别和 run 和 poll 一致。
post 和 dispatch
对 post 函数的调用会添加一个完成句柄到队列(为了方便表述,这里抽象出一个完成句柄的队列)并立即返回。稍后对 run 的调用负责分派完成句柄。还有另一个名为 dispatch 的函数,可以用来请求 io_context 在可能的情况下立即分派一个完成句柄。如果在一个已经调用了 run, poll, run_one 或 poll_one 之一的线程中调用了 dispatch,那么完成句柄将立即被分派。如果没有这样的线程可用,dispatch 会添加完成句柄到队列,并像 post 一样返回。
1
2
3
4
5
6
7
8
9
10
11
12
13
14
15
16
17
#include <boost/asio.hpp>
#include <iostream>

int main() {
  boost::asio::io_context context;
  // Hello Handler – dispatch behaves like post
  boost::asio::dispatch(context, []() { std::cout << "Hello\n"; });
  boost::asio::post(context, [&context] {  // English Handler
    std::cout << "Hello, world!\n";
    boost::asio::dispatch(context, [] {  // Spanish Handler, immediate
      std::cout << "Hola, mundo!\n";
    });
  });
  // German Handler
  boost::asio::post(context, [] { std::cout << "Hallo, Welt!\n"; });
  context.run();
}
输出:
1
2
3
4
Hello
Hello, world!
Hola, mundo!
Hallo, Welt!
可以看到,Spanish Handler 的 dispatch 在 German Handler 的 post 之后被调用,但是 Spanish Handler 的完成句柄却先于 German Handler 的完成句柄被执行。
在 Asio 源码的注释中我们会看到这样的描述:
1
On immediate completion, invocation of the handler will be performed in a manner equivalent to using boost::asio::post().
上述注释来自 async_accept,它的意思是,即使 async_accept 能立即完成异步操作,它也会像 post 那样按顺序分派完成句柄。
阻止 run() 返回
某些应用程序可能需要阻止 io_context 对象的 run() 调用在没有更多工作要做时返回。例如,io_context 可能在应用程序的异步操作之前在后台线程中运行。可以使用 make_work_guard 函数创建 boost::asio::executor_work_guard<io_context::executor_type> 类型的对象来保持 run() 调用运行:
1
2
3
boost::asio::io_context io_context;
boost::asio::executor_work_guard<boost::asio::io_context::executor_type> work_guard
  = boost::asio::make_work_guard(io_context);
使用 strand 来串行执行
多个线程对同一个 io_context 调用 run() 后,它们将并发地执行完成句柄。这意味着访问共享资源时需要同步对资源的访问。在完成句柄中去编写同步代码会使程序代码变得复杂,一个替代的方式是使用 Asio 提供的 strand 对象。
在同一个 strand 中的完成句柄永远严格按照添加顺序串行执行。通过下面的方式创建一个 strand:
1
2
3
4
// 两种方式都可以
boost::asio::strand<boost::asio::io_context::executor_type> the_strand(
    context.get_executor());
auto the_strand = boost::asio::make_strand(context.get_executor());
bind_executor 将一个原始的完成句柄绑定到一个 strand 上,形成一个新的完成句柄。下面的代码将一个属于 the_strand 的函数添加到了 io_context 的队列中。
1
2
3
context.post(boost::asio::bind_executor(the_strand, [](){
    // your function
}));
下面的代码展示了 strand 和非 strand 完成句柄在执行顺序上的区别:
1
2
3
4
5
6
7
8
9
10
11
12
13
14
15
16
17
18
19
20
21
22
23
24
25
26
27
28
29
30
31
32
33
34
35
36
37
38
39
40
41
42
43
44
45
46
47
48
49
50
51
52
53
54
#include <boost/asio.hpp>
#include <boost/date_time.hpp>
#include <boost/thread.hpp>
#include <cstdlib>
#include <ctime>
#include <iostream>
#define PRINT_ARGS(msg) \
do { \
boost::lock_guard<boost::mutex> lg(mtx); \
std::cout << '[' << boost::this_thread::get_id() << "] " << msg \
<< std::endl; \
} while (0)
int main() {
std::srand(std::time(0));
boost::asio::io_context context;
auto strand = boost::asio::make_strand(context.get_executor());
boost::mutex mtx;
size_t regular = 0, on_strand = 0;
auto workFuncStrand = [&mtx, &on_strand] {
++on_strand;
boost::this_thread::sleep(boost::posix_time::seconds((rand() % 2) + 1));
PRINT_ARGS(on_strand << ". Hello, from strand!");
};
auto workFunc = [&mtx, ®ular] {
++regular;
boost::this_thread::sleep(boost::posix_time::seconds((rand() % 2) + 1));
PRINT_ARGS(regular << ". Hello, world!");
};
// Post work
for (int i = 0; i < 15; ++i) {
if (rand() % 2 == 0) {
context.post(boost::asio::bind_executor(strand, workFuncStrand));
} else {
context.post(workFunc);
}
}
// set up the worker threads in a thread group
boost::thread_group workers;
for (int i = 0; i < 5; ++i) {
workers.create_thread([&context, &mtx]() {
PRINT_ARGS("Starting worker thread ");
context.run();
PRINT_ARGS("Worker thread done");
});
}
workers.join_all(); // wait for all worker threads to finish
return 0;
}
部分输出:
1
2
3
4
5
6
7
8
9
10
11
12
13
14
15
16
17
...
[7f0eba5ff640] 1. Hello, from strand!
[7f0eb9dfe640] 5. Hello, world!
[7f0eb8dfc640] 6. Hello, world!
[7f0eb95fd640] 7. Hello, world!
[7f0eb3fff640] 7. Hello, world!
[7f0eba5ff640] 7. Hello, world!
[7f0eb9dfe640] 7. Hello, world!
[7f0eb8dfc640] 7. Hello, world!
[7f0eb95fd640] 2. Hello, from strand!
[7f0eb95fd640] 3. Hello, from strand!
[7f0eb95fd640] 4. Hello, from strand!
[7f0eb95fd640] 5. Hello, from strand!
[7f0eb95fd640] 6. Hello, from strand!
[7f0eb95fd640] 7. Hello, from strand!
[7f0eb95fd640] 8. Hello, from strand!
...
可以看到,strand 中的完成句柄的执行完全是串行的,而非 strand 的完成句柄的执行顺序是随机的。值得注意的还有,执行第 1 个 strand 完成句柄的线程和执行后面几个 strand 完成句柄的线程并不相同。strand 中的完成句柄是串行执行的,但并不意味着它们一定是在同一个线程中执行的。
网络 I/O
我们最常使用 Asio 的场景就是 TCP/UDP 网络编程。官方也提供了一些示例代码供我们参考,下面就是一个回射服务器的示例代码:
1
2
3
4
5
6
7
8
9
10
11
12
13
14
15
16
17
18
19
20
21
22
23
24
25
26
27
28
29
30
31
32
33
34
35
36
37
38
39
40
41
42
43
44
45
46
47
48
49
50
51
52
53
54
55
56
57
58
59
60
61
62
63
64
65
66
67
68
69
70
71
72
73
74
75
76
77
78
79
80
81
82
83
84
85
86
87
88
#include <boost/asio.hpp>
#include <cstdlib>
#include <iostream>
#include <memory>
#include <utility>

using boost::asio::ip::tcp;

class session : public std::enable_shared_from_this<session> {
 public:
  session(tcp::socket socket) : socket_(std::move(socket)) {}

  void start() { do_read(); }

 private:
  void do_read() {
    auto self(shared_from_this());
    socket_.async_read_some(
        boost::asio::buffer(data_, max_length),
        [this, self](boost::system::error_code ec, std::size_t length) {
          if (!ec) {
            do_write(length);
          }
        });
  }

  void do_write(std::size_t length) {
    auto self(shared_from_this());
    boost::asio::async_write(
        socket_, boost::asio::buffer(data_, length),
        [this, self](boost::system::error_code ec, std::size_t /*length*/) {
          if (!ec) {
            do_read();
          }
        });
  }

  tcp::socket socket_;
  enum { max_length = 1024 };
  char data_[max_length];
};

class server {
 public:
  server(boost::asio::io_context& io_context, short port)
      : acceptor_(io_context, tcp::endpoint(tcp::v4(), port)) {
    boost::asio::socket_base::reuse_address option(true);
    acceptor_.set_option(option);
    do_accept();
  }

 private:
  void do_accept() {
    acceptor_.async_accept(
        [this](boost::system::error_code ec, tcp::socket socket) {
          if (!ec) {
            std::make_shared<session>(std::move(socket))->start();
          }

          do_accept();
        });
  }

  tcp::acceptor acceptor_;
};

int main(int argc, char* argv[]) {
  try {
    if (argc != 2) {
      std::cerr << "Usage: async_tcp_echo_server <port>\n";
      return 1;
    }

    boost::asio::io_context io_context;

    server s(io_context, std::atoi(argv[1]));

    for (int i = 0; i < 5; i++) {
      std::thread([&]() { io_context.run(); }).detach();
    }

    io_context.run();
  } catch (std::exception& e) {
    std::cerr << "Exception: " << e.what() << "\n";
  }

  return 0;
}
这里有几个点需要注意。首先,我们注意到这段代码中并没有调用 bind, listen 等函数,我们预想中的初始化工作是:
1
2
3
4
5
6
7
boost::asio::ip::tcp::acceptor the_acceptor(the_context);
boost::asio::ip::tcp::endpoint endpoint(boost::asio::ip::tcp::v4(), port_num);
the_acceptor.open(endpoint.protocol());  // call socket and epoll_ctl(ADD)
the_acceptor.set_option(
    boost::asio::socket_base::reuse_address(true));  // call setsockopt
the_acceptor.bind(endpoint);                         // call bind
the_acceptor.listen();                               // call listen
acceptor_(io_context, tcp::endpoint(tcp::v4(), port)) 调用覆盖了上述大部分工作,而 setsockopt 在 listen 系统调用之后被调用。
第二要思考的点是,如果多次调用 accept 会发生什么?会有性能上的提升吗?程序代码每一次对 async_accept 调用都是添加一个需要异步操作执行单元去完成的 accept 的操作。常见的做法是,程序在 async_accept 的完成句柄中再一次调用 async_accept。程序代码应该尽量避免两次调用 async_accept 的间隔过长。如果该情况无法避免,一个备选的方案是多次调用 async_accept,并且启动多个线程去执行 io_context.run(),以确保连接建立事件发生时,有足够的线程可以去 accept。
第三要思考的点是,我们可以多次调用 async_read 或 async_write 吗?这个问题要分为两个情况考虑。如果是对不同的套接字,那么可以重复调用读写函数,不同套接字的读写互不影响。如果是对同一个已连接套接字,重复调用读写函数不是一个良好的行为。例如,考虑多线程条件下从套接字接收数据,多次的 async_read_some 可能引起不同的调用链路,出现许多我们难以解决的线程同步问题。
async_read 内部实际上是串行地调用了多次 async_read_some,即在前一个 async_read_some 的完成句柄中调用了下一个 async_read_some,或者使用了 strand 作为限制。这样做法维护了连续地对 recvfrom 的调用,而不是让多个实体不受控制地随意调用 recvfrom。如果我们想连续的接收或发送多段数据,也可以借鉴这个思想。
Comments